To export the video I went to File\Export\Media.
This brought up the export settings for the video.
I chose to use an MPEG2 format as it gave me the ability to use HD 720p resolution. I wanted to use this as all of my videos were recorded in this resolution. After checking all my settings were correct I pressed export and created my final video.
Monday 6 December 2010
Video Production with Premier Pro Part 4
I had now positioned all my video and audio clips in the correct places I started work on adding transitions and effects.
I decided not to use transitions to change between gameplay clips as I wanted to keep it fast paced to jump between the action. But I mainly used variants of fading between storyline footage because it kept with my theme of being subtle and dark.
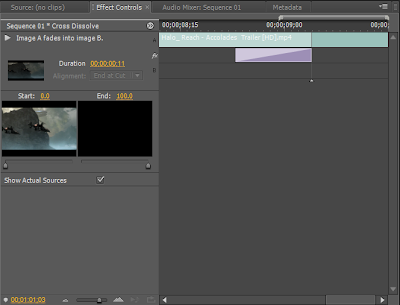
The intro of my video is of a Falcon flying into planet reach dropping off the soldiers ready for the battle. I used the Cross Dissolve effect between these clips so it would fade between clips as the falcon lands. To add the clip I just dragged the effect onto the timeline where I wanted it.
I used a Cross Zoom to change between the inital introduction to the gameplay as it zoomed into the soldiers as they prepaired for battle and then back out straight into battle. This made it more focused on the group of soldiers and what they were about to do.
I also used a fade effect on the end of my audio track to fade it out and back in for the next audio clip.
This worked in exactly the same way as all the video transitions.
This gave me my final project:
I decided not to use transitions to change between gameplay clips as I wanted to keep it fast paced to jump between the action. But I mainly used variants of fading between storyline footage because it kept with my theme of being subtle and dark.
The intro of my video is of a Falcon flying into planet reach dropping off the soldiers ready for the battle. I used the Cross Dissolve effect between these clips so it would fade between clips as the falcon lands. To add the clip I just dragged the effect onto the timeline where I wanted it.
One problem I found was that if the two clips I wanted to fade were on different video channels I couldn't have the transition over both of them so I had to move the video clip down to the same channel so the transition could merge the two together. When I added in the transition it was too short for what I wanted so by dragging the edges of the transition I could make it longer or shorter.
Some of the videos I had imported already had fade transitions applied to them so I just used the same effect on the previous clip to merge them together.
Double clicking on the applied transition opens up the properties for that transition which gave me the ability to change things about the transition such as where the transition starts and ends and the opacity of the transition.
I also used a fade effect on the end of my audio track to fade it out and back in for the next audio clip.
This worked in exactly the same way as all the video transitions.
This gave me my final project:
Video Production with Premier Pro Part 3
As I no longer needed the audio that came with the video clips I removed them so my timeline was clearer and easier to understand.
Currently the video clips and the audio clips were linked together so I seperated them by right clicking on each of the video clips and selected 'Unlink'.
Now the video and audio clips were seperated on the timeline and I deleted all the audio clips I didn't want.
Currently the video clips and the audio clips were linked together so I seperated them by right clicking on each of the video clips and selected 'Unlink'.
Now the video and audio clips were seperated on the timeline and I deleted all the audio clips I didn't want.
Subscribe to:
Posts (Atom)


